Embarking on a basement renovation project can be an exciting endeavor, offering the opportunity to transform underutilized space into a functional and inviting area within your home. Among the various tasks involved in such a project, drywall installation stands out as a fundamental aspect that requires careful attention and skill. Whether you’re envisioning a cozy family retreat, a stylish home theater, or a versatile home office, mastering the art of drywall installation is essential for achieving professional results. In this comprehensive guide, we’ll delve deeply into every aspect of installing drywall in your basement renovation, providing step-by-step instructions, tips, and insights to help you navigate the process with confidence and precision.
1. Preparing for Success: Before diving into the drywall installation process, thorough preparation is key to ensuring a smooth and successful renovation experience. Here’s what you need to consider:
Assessing the Space: Begin by thoroughly assessing your basement space, taking accurate measurements of the walls and ceiling. This step will help you determine the quantity of drywall materials required for the project, ensuring that you purchase the appropriate amount without excess waste or shortage.
Gathering Materials and Tools: Compile a comprehensive list of materials and tools needed for drywall installation, including drywall sheets, screws, joint compound, drywall tape, sandpaper, a utility knife, a drywall saw, a drill/driver, a taping knife, and safety gear such as gloves and goggles. Procure high-quality materials to ensure durability and longevity in your renovation.
Preparing the Work Area: Clear the basement space of any furniture, fixtures, or debris that may obstruct the installation process. Ensure proper ventilation and consider employing a dehumidifier to regulate moisture levels, particularly in basements prone to dampness or humidity.
2. Framing Foundations: Before installing drywall, it’s essential to establish a sturdy framework to support the structure and provide a secure mounting surface. If your basement walls are not already framed, follow these steps to create a solid foundation:
Selecting Lumber: Choose pressure-treated lumber for framing to safeguard against moisture damage, a common concern in basement environments. Ensure that the lumber is of suitable dimensions and quality to provide adequate support for the drywall.
Framing Walls: Using a framing square and level, meticulously frame the walls according to the predetermined measurements, ensuring they are plumb and square. Secure the framing members (studs) to the floor and ceiling joists using appropriate fasteners, such as nails or screws, spaced at regular intervals for stability.
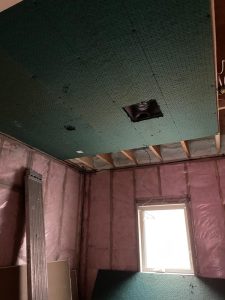
Framing Ceilings: Extend the framing process to the ceiling, attaching joists perpendicular to the floor joists and ensuring proper spacing to accommodate drywall sheets. Install blocking between joists as needed to reinforce structural integrity and provide additional support.
3. Installing Drywall: With the framing in place, it’s time to tackle the main event: installing the drywall. Follow these step-by-step instructions for a seamless and efficient installation process:
Preparing Drywall Sheets: Measure and cut drywall sheets to fit the dimensions of the walls and ceiling, making precise cuts around obstacles such as pipes, ducts, and electrical outlets using a utility knife or drywall saw. Be mindful of minimizing waste and optimizing material usage to avoid unnecessary expenses.
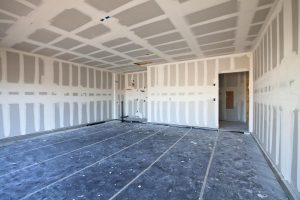
Ceiling Installation: Begin by installing drywall on the ceiling, as this is typically the most challenging and labor-intensive aspect of the process. Enlist the assistance of a drywall lift or a capable helper to hold the sheets in place while you secure them to the ceiling joists using drywall screws. Start from one end of the room and work methodically across, ensuring a snug fit and minimal gaps between sheets.
Wall Installation: With the ceiling drywall in place, proceed to install drywall on the walls, starting from one corner and progressing systematically along each wall. Use a drill/driver to insert screws into the studs at regular intervals, ensuring secure attachment and minimal protrusion from the surface.
Seam Management: Stagger the seams between drywall sheets to minimize visible joints and enhance structural stability. Leave a small gap (approximately 1/8 inch) between sheets to accommodate expansion and contraction, particularly in areas prone to temperature fluctuations.
4. Taping and Mudding Mastery: Once the drywall sheets are securely installed, it’s time to transition to the taping and mudding stage, which involves concealing the joints and achieving a smooth, seamless surface. Follow these expert tips for mastering the art of taping and mudding:
Applying Drywall Tape: Utilize self-adhesive drywall tape to cover the joints between drywall sheets, pressing it firmly into place to ensure proper adhesion. For added reinforcement, consider embedding the tape in a thin layer of joint compound using a taping knife, smoothing out any excess compound for a flush finish.
Coating with Joint Compound: Apply a generous coat of joint compound over the taped seams, using a taping knife to spread the compound evenly and feather the edges for a seamless transition. Allow the first coat to dry completely before applying subsequent coats, gradually building up layers to achieve the desired level of smoothness and durability.
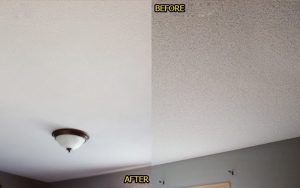
Sanding for Perfection: Once the joint compound has dried thoroughly, use fine-grit sandpaper or a sanding sponge to smooth out any imperfections and create a uniform surface texture. Exercise patience and precision during the sanding process, taking care not to over-sand or damage the drywall surface.
5. Finishing Touches and Beyond: With the taping and mudding complete, your drywall is now primed and ready for the finishing touches that will bring your basement renovation to life. Follow these final steps to add polish and personality to your newly renovated space:
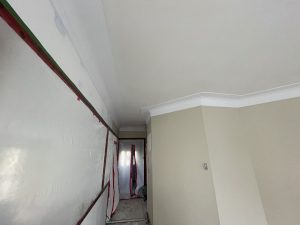
Priming the Surface: Apply a coat of high-quality primer to the drywall surface, sealing the pores and providing a uniform base for paint application. Choose a primer specifically formulated for drywall to enhance adhesion and ensure optimal paint performance.
Painting with Precision: Select your preferred paint colors and finishes, using a roller for large surface areas and a brush for detailed work around edges and corners. Apply multiple coats of paint as needed, allowing sufficient drying time between coats for optimal coverage and durability.
Accessorizing and Decorating: Install baseboards, trim, and other decorative elements to enhance the aesthetic appeal of your renovated basement. Consider incorporating accent lighting, artwork, and furnishings to personalize the space and create a welcoming atmosphere for family and guests.
Maintenance and Care: Maintain the integrity and appearance of your newly renovated basement by implementing regular maintenance and care practices. Monitor humidity levels, address any signs of moisture or water intrusion promptly, and conduct periodic inspections to identify and address any potential issues before they escalate.
Conclusion: Mastering the art of drywall installation is a critical component of any basement renovation project, requiring meticulous planning, skillful execution, and attention to detail. By following the comprehensive guide outlined above and leveraging expert tips and techniques, you can achieve professional-quality results that enhance the beauty, functionality, and value of your home. Whether you’re embarking on a DIY endeavor or enlisting the assistance of professional contractors, approach the process with confidence and enthusiasm, knowing that your efforts will yield a transformed space that brings joy and satisfaction for years to come. Happy renovating!