Frequently Asked Questions About Drywall Installation
Drywall, also known as gypsum board or sheetrock, is a widely used material in the construction industry for creating interior walls and ceilings. Its popularity stems from its cost-effectiveness, ease of installation, and the smooth surface it provides for painting and finishing. However, like any construction process, drywall installation can present challenges and questions. In this comprehensive guide, we will address some frequently asked questions about drywall installation to help you navigate this important step in building or renovating your home.
1. What is drywall, and why is it used in construction?
Drywall, also referred to as gypsum board or sheetrock, is a building material composed of gypsum plaster sandwiched between layers of paper. It is a ubiquitous choice for creating interior walls and ceilings due to several key advantages:
Cost-effectiveness: Drywall is an affordable material, making it a practical choice for various construction projects.
Ease of installation: Drywall is relatively easy to install, which can save both time and labor costs.
Smooth finish: The surface of drywall is smooth and uniform, providing an excellent canvas for painting, wallpaper, or other finishing touches.
Fire resistance: Drywall is fire-resistant, providing an added layer of safety in buildings.
Sound insulation: Drywall can help reduce sound transmission, making it a valuable choice for soundproofing in residential and commercial spaces.
Versatility: Drywall is available in various types, sizes, and thicknesses, making it suitable for a wide range of applications.
2. What are the essential tools needed for drywall installation?
Proper tools are essential for a successful drywall installation. The following tools are commonly used:
Utility knife: A utility knife is used for cutting drywall sheets to the desired size.
Drywall saw or rotary tool: These tools are essential for cutting holes or making precise cuts in drywall.
T-square: A T-square ensures accurate, straight cuts when measuring and marking the drywall.
Tape measure: A tape measure helps in taking precise measurements of the installation area.
Drywall screws or nails: These fasteners are used to secure the drywall to wall studs or ceiling joists. Screws are generally preferred for their strength and stability.
Joint compound: Also known as “mud,” joint compound is used for covering seams and fasteners, creating a smooth and seamless surface.
Putty knife: A putty knife is used to apply and smooth joint compound.
Sandpaper: Sandpaper is necessary for smoothing the joint compound and creating a seamless finish.
Drywall lift: This tool is particularly useful when installing drywall on ceilings, assisting in holding the panels in place while they are fastened.
3. How do I measure and cut drywall accurately?
Measuring and cutting drywall accurately is crucial for a successful installation. Here’s a step-by-step guide:
Measuring:
Measure: Use a tape measure to measure the dimensions of the installation area accurately. Measure both the length and width.
Mark: Mark the measurements on the drywall sheet using a pencil. Use a T-square to ensure straight and even lines.
Cutting:
Score: Use a utility knife to score the front paper layer along the marked line. Press firmly to cut through the paper but not the gypsum core.
Snap: Once the front paper is scored, carefully bend the drywall sheet along the scored line, applying pressure to snap it along the line. This will expose the gypsum core.
Cut the back paper: After snapping the drywall, use the utility knife to cut through the back paper layer, completing the cut.
By following these steps, you can accurately measure and cut drywall to fit the installation area.
4. Should I use screws or nails to hang drywall?
When it comes to attaching drywall to wall studs or ceiling joists, drywall screws are generally preferred over nails for several reasons:
Strength: Screws provide a stronger and more secure attachment, reducing the risk of the drywall pulling away from the studs or joists over time.
Prevention of “popping”: Drywall screws are less likely to cause “popped” nail heads, which can lead to visible bulges in the drywall surface.
Easy dimpling: Screws can be easily countersunk (dimpled) into the drywall surface, making it easier to cover with joint compound for a seamless finish.
Sag prevention: When properly installed with screws, drywall is less likely to sag or develop gaps between fasteners.
While screws are generally the preferred option, nails can still be used effectively for drywall installation. If you choose to use nails, be sure to use the appropriate length and spacing to ensure a secure attachment.
5. What is the process for taping and mudding drywall seams?
Taping and mudding are essential steps to create a smooth and seamless finish for your drywall installation. Here’s a step-by-step guide:
Taping:
Apply joint tape: Place joint tape over the seams between the drywall panels. Press it into the wet joint compound.
Smooth out: Using a putty knife or a taping knife, smooth out the tape, removing any excess joint compound and ensuring it adheres tightly to the seams.
Mudding:
First coat: Apply a thin layer of joint compound over the taped seams. Feather the compound, tapering it away from the seams. This first coat is also known as the “bed coat.”
Second coat: After the first coat dries (usually 24 hours), apply a second, wider coat of joint compound. Feather the edges to create a smooth transition to the surrounding drywall. This coat is often called the “fill coat.”
Subsequent coats: Depending on the desired finish and the quality of the initial application, you may need to apply additional coats of joint compound, each one wider and smoother than the previous one. Be sure to allow adequate drying time between coats and sand between coats for a smooth finish.
Sanding: Once the final coat is dry, sand the entire mudded area to create a perfectly smooth and seamless finish.
Taping and mudding require patience and attention to detail, but they are essential for achieving a professional-looking result.
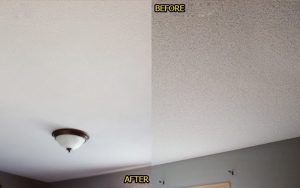
6. How do I create different drywall textures?
Drywall texture can add character and visual interest to your walls or ceilings. There are several techniques for achieving various textures, including:
Smooth finish: For a smooth finish, apply joint compound evenly and sand it to perfection. This is ideal for a clean and modern look.
Textured finish: To create texture, you can use a textured roller or brush to apply joint compound in a consistent pattern.
Orange peel: The orange peel texture is achieved by spraying thinned joint compound onto the surface and then lightly “knocking down” the texture with a trowel or putty knife.
Knockdown finish: This texture involves spraying joint compound onto the surface and then flattening it with a trowel to create a mottled, knocked-down effect.
Each texture requires different tools and techniques, so it’s essential to practice on scrap drywall before applying your chosen texture to the project surface.
7. Can I repair small holes and cracks in drywall myself?
Yes, you can repair small holes and cracks in drywall yourself. Here’s a basic process for addressing these issues:
Small Holes:
Clean the hole: Remove any loose or damaged drywall material around the hole.
Apply patching compound: Fill the hole with patching compound and use a putty knife to smooth it.
Sand and paint: Once the patching compound is dry, sand it smooth and paint over the repaired area to match the existing wall.
Cracks:
Clean the crack: Remove any loose or damaged material along the crack.
Apply joint compound: Fill the crack with joint compound, ensuring it’s smooth and even with the surrounding wall.
Sand and paint: After the compound dries, sand it to create a seamless finish and repaint the area.
For larger damage, such as larger holes or extensive cracks, you may need to use patching material or replace the damaged section of drywall.
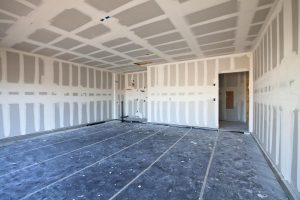
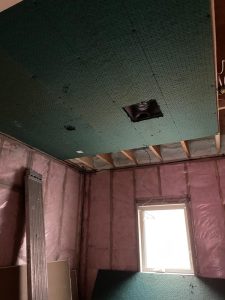
8. What’s the best way to hang drywall on ceilings?
Installing drywall on ceilings can be challenging due to gravity, but it can be made easier with the right techniques. Here’s how to do it effectively:
Use a drywall lift: A drywall lift is a handy tool that holds the drywall in place while you fasten it to the ceiling. This significantly reduces the physical effort required.
Start in the center: Begin installing drywall panels from the center of the ceiling and work your way out towards the edges. This helps distribute the weight evenly and ensures a balanced installation.
Proper fastening: Use screws to secure the drywall to the ceiling joists. Be sure to space the screws evenly and at the correct depth to prevent sagging or uneven surfaces.
Seam alignment: Align the seams of the ceiling drywall with those on the walls, ensuring a seamless transition.
Support the edges: Use additional support, such as 2x4s or T-bars, to help hold the edges of the drywall in place while fastening them.
Screw pattern: Follow a specific screw pattern to ensure even distribution of fasteners and minimize the risk of sagging.
Hanging drywall on ceilings is often a two-person job, with one person holding the drywall while the other fastens it. The use of a drywall lift is highly recommended for safety and ease.
9. How do I match existing wall textures when making repairs?
Matching existing wall textures can be a challenging task, especially when you’re making repairs or touch-ups. Here are some general steps to achieve a good match:
Identify the existing texture: Examine the existing wall to determine its texture. Common textures include smooth, orange peel, knockdown, and more.
Practice: Before applying the texture to the repaired area, practice on a scrap piece of drywall. This helps you perfect your technique and achieve a close match.
Texture application: Apply the chosen texture method to the repaired area. This might involve using a texture roller, a brush, a trowel, or a spray gun.
Blend and feather: Blend the edges of the newly applied texture into the surrounding area, feathering it gradually to create a seamless transition.
Allow drying time: Give the newly textured area ample time to dry before painting or finishing.
Matching existing wall textures can be tricky, so don’t be discouraged if it takes a bit of practice to achieve a perfect match. It’s often a trial-and-error process to get the desired result.
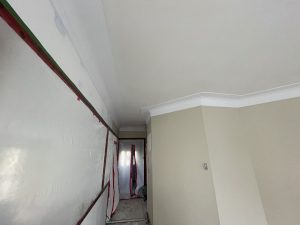
10. What are some tips for painting drywall?
Painting drywall is the final step in the process, and it can significantly impact the appearance of your walls and ceilings. Here are some tips for achieving a successful paint job:
Primer: Apply a coat of primer before painting. Primer helps the paint adhere better and provides a more even finish.
Quality paint: Invest in high-quality paint for a better result. Cheaper paints may require multiple coats and can result in a less durable finish.
Two coats: In most cases, two coats of paint are necessary for an even and uniform finish. Allow the first coat to dry completely before applying the second.
Proper technique: Use a roller for large surfaces and a brush for corners and edges. Apply paint evenly, working in one direction to prevent streaks.
Preparation: Properly prepare the area before painting by covering floors and furniture and using painter’s tape to protect trim and edges.
Drying time: Allow the paint to dry completely between coats and before removing any protective coverings.
A well-executed paint job can transform the appearance of your drywall, so take your time and follow these tips for the best results.
11. Are there any common mistakes to avoid during drywall installation?
While drywall installation is generally a straightforward process, there are common mistakes that you should be aware of and avoid:
Over-tightening screws: Over-tightening screws can cause the drywall to become deformed or even crack. It’s important to tighten screws just enough to secure the drywall without causing damage.
Not allowing proper drying time: Joint compound needs time to dry between coats. Rushing this process can result in a poor finish. Follow the manufacturer’s recommendations for drying times.
Failure to align seams: Properly aligning the seams of adjacent drywall panels is crucial. Misaligned seams can lead to a bumpy and uneven surface.
Inadequate fasteners: Using too few fasteners or fastening too close to the edges can cause sagging or cracks in the drywall.
Not using a level: Failing to check for level and plumb during installation can result in walls or ceilings that are not straight.
Ignoring safety precautions: Always follow safety guidelines when working with drywall. Wear appropriate safety gear, use the correct tools, and take precautions to prevent accidents.
By being aware of these common mistakes and taking steps to avoid them, you can achieve a successful drywall installation.