In our increasingly noisy world, finding tranquility within our living spaces has become a precious commodity. Whether it’s the bustling city streets, the hum of appliances, or the cacophony of neighbors, unwanted noise can significantly disrupt our peace and productivity. To combat this auditory intrusion, many homeowners turn to a reliable solution: drywall soundproofing.
What is Drywall Soundproofing?
Drywall soundproofing is a technique used to minimize or eliminate sound transmission between rooms or from external sources. It involves enhancing the acoustic performance of drywall, a common building material, to create a more soundproof environment. This practice has gained popularity in residential and commercial spaces, offering an effective way to create quieter, more comfortable living and working areas.
Key Principles of Drywall Soundproofing
Mass: The primary principle of soundproofing is adding mass to the structure. Heavier materials are better at blocking sound. Traditional drywall is relatively thin and provides minimal sound insulation. To address this, soundproof drywall, often called “quiet rock” or “soundproof drywall,” is used. It is denser and thicker than standard drywall, effectively reducing sound transmission.
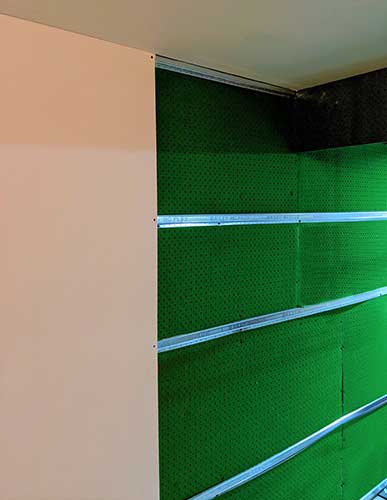
Decoupling: Sound can easily travel through interconnected structures. Decoupling involves creating a separation between surfaces to prevent sound from transferring. This is achieved by installing resilient channels or using specialized clips and brackets to attach the drywall to the wall or ceiling studs. These components break the physical connection between the two surfaces, minimizing sound transmission.
Damping: Damping materials absorb sound energy, reducing the resonance and vibrations that can amplify noise. Adding damping compounds or materials like Green Glue between layers of drywall can significantly improve soundproofing effectiveness.
Sealing: Even the smallest gaps and cracks can allow sound to penetrate. Proper sealing of joints and seams with acoustic caulk ensures an airtight barrier, preventing sound leakage.
Benefits of Drywall Soundproofing
Enhanced Privacy: Drywall soundproofing creates a more private environment, preventing conversations, television noise, or other household activities from disturbing neighbors or other occupants.
Improved Concentration: For home offices or studios, soundproofing allows for greater focus and productivity by reducing external noise distractions.
Peaceful Living: In urban areas or noisy neighborhoods, soundproofing provides peace and tranquility, allowing homeowners to enjoy a quiet living space.
Increased Property Value: Homes equipped with effective soundproofing are often more appealing to potential buyers, which can increase property value.
Compliance with Building Codes: In some jurisdictions, building codes require soundproofing measures in multi-unit dwellings to ensure a minimum level of acoustic comfort for occupants.
Drywall soundproofing is a valuable investment for homeowners and businesses alike seeking to improve acoustic comfort. By incorporating principles such as mass, decoupling, damping, and sealing, it is possible to create quieter and more peaceful spaces. Whether you desire a soundproof home theater, a productive workspace, or simply a quieter living environment, soundproofing your drywall can make a significant difference in your daily life, providing the serenity and tranquility we all crave in our busy world.
Soundproofing involves a combination of materials and techniques to reduce or eliminate the transmission of sound between spaces. Here is a step-by-step procedure for soundproofing a room:
Assess the Room: Begin by assessing the room to identify the sources of noise and the areas where sound is most likely to enter or exit. This includes identifying walls, ceilings, and floors that require soundproofing.
Select Soundproofing Materials:
- Choose appropriate soundproofing materials such as acoustic drywall, mass-loaded vinyl, acoustic foam panels, acoustic ceiling tiles, and acoustic caulk. The choice of materials depends on the specific needs of your project and budget.
Seal Gaps and Cracks:
- Inspect the room for any gaps, cracks, or openings that could allow sound to pass through. Seal these openings using acoustic caulk or weatherstripping.
- Pay close attention to areas around windows, doors, electrical outlets, and vents.
Add Mass to Walls, Ceilings, and Floors:
- Install additional layers of drywall or acoustic panels to increase the mass of the walls and ceilings. Ensure that the new layers are not in direct contact with the existing surfaces to prevent sound transmission through structural connections.
- Consider using mass-loaded vinyl (MLV) as an underlayment on floors to reduce impact noise.
Decouple Walls and Ceilings:
- Use resilient channels, isolation clips, or sound isolation clips to decouple the new drywall or panels from the existing structure. This prevents vibrations and sound from traveling through the framing.
- Install these decoupling elements perpendicular to the framing studs or joists.
Apply Damping Materials:
- Apply damping compounds like Green Glue between layers of drywall or panels to absorb sound energy and reduce vibrations. Follow the manufacturer’s instructions for proper application.
Install Acoustic Insulation:
- For interior walls and ceilings, consider adding acoustic insulation (e.g., fiberglass or mineral wool) between the framing studs or joists. This helps absorb and dampen sound.
- Make sure to use insulation with appropriate soundproofing properties.
Soundproof Doors and Windows:
- Upgrade existing doors and windows to soundproof versions or add soundproofing materials such as weatherstripping, acoustic curtains, or window inserts.
- Install solid-core doors with good sealing properties to prevent sound from leaking through gaps.
Treat Reflective Surfaces:
- If the room has hard, reflective surfaces like glass, tile, or hardwood floors, consider adding soft furnishings, area rugs, and acoustic panels to absorb sound and reduce reverberation.
Test and Adjust:
- After completing the soundproofing measures, perform a sound test to assess the effectiveness of the improvements. Listen for any remaining noise leaks or echoes.
- If necessary, make adjustments by adding more soundproofing materials or sealing any overlooked gaps.
- Once you are satisfied with the soundproofing results, finish the room with paint, wall coverings, or other decorative elements to achieve the desired aesthetic.
Remember that the specific procedures and materials may vary based on the type of noise you’re trying to block (airborne or impact noise), the room’s construction, and your budget. It’s often helpful to consult with a professional acoustic engineer or contractor to ensure the most effective soundproofing solution for your specific needs.


